Diva Farm Days: Upcycling

Showing posts with label Upcycling. Show all posts

Basket Planter

I love Pinterest, what a time wasting app that is full of amazing ideas. Today’s inspired project, upcycling a chair and basket into a planter. 


I gathered an old chair and an unused basket and painted them white. 

After they dried I spread a garbage bag in the basket as a liner and poked a few holes in it for drainage. I put a layer of bark chips in the bottom before topping with a sand and potting mix combo. 


The finishing touch was to plant flowers - dahlia, fuchsia and a geranium. 


Daisy and pansy pot under the chair

Enjoy :)

Ann
0

Recycling Christmas Cards

What do you do with all the Christmas cards you receive each year?  
If you’re like me you don’t want to throw them out (sentimental reasons) but you also have nowhere to store them (practical reasons). Furthermore, what are you storing them for anyway? It’s not as if you’re going to drag them out and look at them again!
Further on from a previous post I am still recycling Christmas cards. 
https://drive.google.com/uc?export=view&id=1NZTP0AY6uAJreqSf4018Eex4GsPjak9q
This year I ran out of Christmas tags for gifts, so I decided that I would upcycle our Christmas cards and turn them into tags for next years gifts. 
https://drive.google.com/uc?export=view&id=1SQh6yc5HkwzPe-QFwq9W6vGXqDO6KWdM
I tore the cards in half and used my Sizzix Bigshot and tag stencils to create new tags. 
https://drive.google.com/uc?export=view&id=1gGuRwKDYr3F8iqpjqycfY_RsZ3HPAyYX
With 2020 being the year it was I am preparing early for 2021. 

Wishing you all a Happy New Year.

Ann
0

What to do with all those Christmas cards

I love sending and receiving Christmas cards, but what do you do with all the cards after Christmas?

After researching Pinterest I found a lot of uses for recycled cards.

I spent a creative afternoon with my scissors and glue stick and made use of the Christmas cards we had received that otherwise would have been thrown out.

Bookmark
Gift Tags

Gift boxes
Gift boxes

Next Christmas I will be prepared with gift tags and boxes for wrapping, bookmarks as gifts and lots more ideas to upcycle the Christmas cards we receive.

Wishing you all a safe and healthy New Year.

Enjoy

Ann
©


0

Making Olive Oil

We have 4 olive trees, I don't eat olives, so what do we do with all the fruit?


A number of years ago we decided to pick our olives and take them to a friends farm for pressing into olive oil.  We have not bought olive oil since and the best thing is we know exactly what has gone into our oil and where it has come from.


It is a laborious job picking the olives, but time passes quickly when you pick with friends.  We now have a small community who we pick with and then pool our olives into one big batch for pressing.


I bought this wonderful apron a few years ago from a market and it has made picking the olives a lot easier.  I have both hands free for picking and can just load the apron up to be emptied into our picking crates.


After pressing we decant our oil into upcycled bottles (my husband eagerly helps with emptying the wine bottles :))

We use our oil for almost all our cooking and it is delicious as a dip with some bread and dukkah.


My helper
4

My sewing room


I do a lot of crafting.

Well I try to do a lot of crafting. I have a lot of UFO's (unfinished projects).  I usually have a couple of projects on the go, be they, scrapbooking, quilting, sewing or crocheting.

I outgrew the spare bedroom, and besides we needed it for guests, so we bought a retired shipping container and my husband converted it to a sewing room.  The shelves were bought from a second hand office furniture shop, all the tables were donated or upcycled from pieces around the farm, the door was our front door (until we got a new one), the screen door was my Dad's and my husband built the ramp and concrete drums it sits on.  The only new things were the windows and the reverse-cycle air-conditioner.


I love going out and spending time in my shed, unfortunately that doesn't happen as often as I would like (housework seems to impede on my "me time").

Even when I do get out there my "me time" isn't just me.  My daughter loves to come out and play and create with me, which I don't mind as much now that she's older as she knows where everything is and can usually fend for herself with limited interruptions to my time.

The other interruption to my "me time" is my cat Tess.  She is a 13yo tortoiseshell.  She loves to be wherever I am and she loves to be as close to me as she can get.  Her favourite position is up on my shoulders, which is not so good for me.  Her other preferred position is to sit on whatever I am sewing or crafting.  She has a perfectly comfortable basket to sleep in on the sewing table, but no, she has to be close to me.


Enjoy

Ann
©


10

Quandong Jam

Living in the Victorian Mallee we are surrounded by native plants, trees and flowers.  One of these is the Quandong (Santalum acuminatum) or native peachThis parasitic tree belongs in the same family as the Sandalwood.

In early Spring the Quandong produces a small bright red fruit, it has a bitter taste but the fruit is delicious when made into jam.

Quandong Jam

2 cups of Quandongs de-seeded and roughly chopped 
2 cups castor sugar
2 cups water
1 tsp balsamic vinegar

Boil together stirring continuously.  Pour into sterilised jars, seal and label.


Looking forward to enjoying this on my toast in the morning.


When you have finished preparing the fruit, you are left with these wonderful seeds.  My Mother-in-law had collected hundreds of them which I have in a jar in my craft room.

So far I have used them as game pieces in a Chinese Checkers game and as beads in a necklace.  I am still looking for more uses for them, so any ideas will be gratefully accepted.


Enjoy

Ann
©

2

How to make Lavender bath salts

I don't know about you, but I love a long hot soak in a bath.  It usually includes bubble bath, a book and a glass of wine.  Leave me in there for an hour to unwind and relax and I come out a new (albeit wrinkly) person.

Since I have been drying my own lavender I have googled uses for the lavender and I decided to make my own bath salts.  A lot cheaper than the bought goods and I also know exactly what is in them.

I have re-purposed an old jar and added the following ingredients:
6 parts sea salt,
3 parts epsom salt
1 part bi-carb soda
1 part dried lavender heads
a couple of drops of lavender essential oil
and for a bit of fun I added some soap colourant

I have also made a second batch excluding the lavender heads, essential oil and soap colourant.  To this batch I have put in my empty essential oil bottles.  The salts and bi-carb will absorb any residue left in the bottles and this will not only make the salts smell delicious but also clean the bottles so that none of the essential oil goes to waste.
Enjoy

Ann
©


2

Bookweek

With bookweek coming up I asked my daughter what/who she would like to go as this year? With only a couple of weeks to plan and create (and a sore back thrown in for good measure) I wanted her choice to be something simple.

"Mum, I would like to go as Lady Morgana, from Merlin (the BBC tv series)".

Okay, not quite in the easy category but with a bit of planning we can do this.  First let's watch the dvd and see what she wears.

I sketched a quick outline of what she wore and went hunting through my fabric stash for suitable fabrics.  Leftover material from a dress I made and an old bedspread from my childhood, perfect.

So with a design in mind and a pattern of sorts (thank you Google), I took my daughters measurements and as my husband always says "measure twice, cut once", we headed off into the unknown world of Camelot.

Mercifully I  only had to unpick a couple of seams and with some creative cutting and joining of fabrics we had a finished dress and jacket.  Some finishing touches of lace and buttons from the button jar and we are both very happy with the end result.

The only purchase I made was the wide rhinstone ribbon which I made into a belt. This cost a total of $9.00.


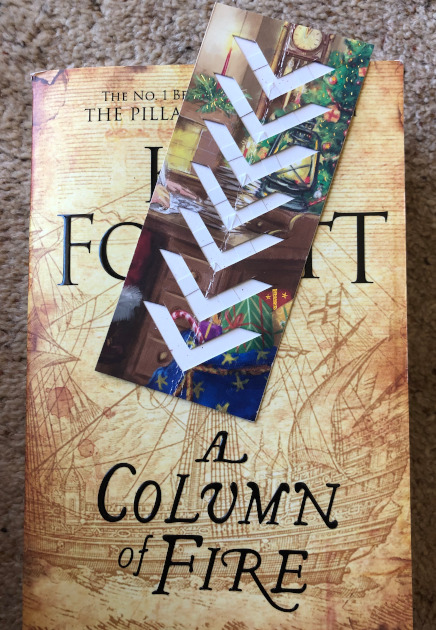
As for the book side of the costume, we have the "Magic Tree House" series of books.

The books feature Jack and Annie who have discovered a magic tree house.  In the treehouse they find books with bookmarks at certain pages left there by the mysterious "M" person.  When they wish to go to the places marked in the book the treehouse magically takes them to that place in time.

My daughter loves the adventures Jack and Annie get up to.  The "M" person who invites them to take all the adventures is Morgan le Fay, aka Morgana.  In this series she is Camelot's librarian and witch, who is searching for lost manuscripts.  Jack and Annie help her in this quest.

Now I have to make her teachers' costume and my costume.

Enjoy

Ann
©


8

Tic-tac-toe

With my husband away for the day I thought what a good opportunity to raid the scrap heap and utilise my findings in the garden.

Instead of the scrapheap I found myself at the woodheap.  After some searching and a bit of grunting and groaning I manoeuvred a nice flat stump onto the bag trolley and wheeled it into place in the garden.

With some newspaper, masking tape and spray paint I painted a tic-tac-toe board onto the surface of the stump and left it to dry while I searched my daughters fairy garden for coloured rocks.

A few well placed garden benches, which I had recently inherited from my Grandma, and I had created a cosy little nook to sit and play in.


The object of Tic Tac Toe is to get three in a row. You play on a three by three game board. Players alternate placing green and blue stones on the game board until either opponent has three in a row or all nine squares are filled.  
My husband, daughter and I love to come out here and play tic-tac-toe.  The battleground rings with laughter.

Enjoy

Ann
©

6

Dryer Balls

Living in the beautiful Mallee with our glorious weather I generally hang my clothes out to dry on the old faithful Hills Hoist.  Occasionally I use the clothes dryer when the weather is bad or I have let the laundry pile grow to the size of Mt Everest.  When I do use the dryer I am always frustrated by the static electricity build up which results in clothes sticking to each other and just being a nuisance. Grrr.

After I bit of research on the internet I found an upcycled natural alternative to dryer sheets. With a bit of tweaking to suit my ingredients I made these dryer balls.


They seemed to be working well after the first use and then disaster struck, aaaargh. Apparently I needed to secure the ends of the wool "securely".

Take two and this time I used the wool needle to darn the ends securely.

What you need:
100% wool
stockings

Wrap the end of the yarn around 2 of your fingers about 10 times, remove it and turn it 90° and wrap another 10 times. Keep repeating this until you are able to hold the "ball" and then continue wrapping tightly forming a round shape.  Once your ball is roughly tennis ball size cut the yarn and tuck the ends into the sides (note: see my above error, so make sure this is secure).

Repeat this process until you have 3 or more balls.

Cut one leg off the stockings, place one ball into the bottom of the leg and tie a knot above to secure it, repeat until all balls have been added and secured.

Put in the washer (can be with dirty laundry) and wash on the hottest setting. This allows the yarn to felt. Once washed dry the balls thoroughly in the dryer at the hottest setting.

When they are dry remove from the stockings and they are ready to use.

I added a couple of drops of essential oil (I used lavender), tossed them in the dryer.  The clothes were mostly static free and smelled lightly of lavender.

Re-add the essential oil every few loads.

Enjoy

Ann
©


2